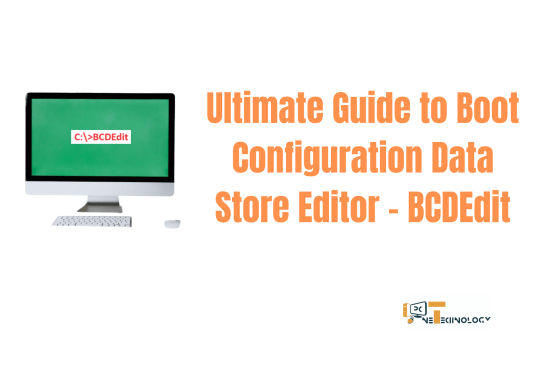
The Boot Configuration Data (BCD Editor) store is a crucial part of the Windows operating system that contains boot configuration parameters and controls how the operating system is started of a Computer. These parameters were previously in the Boot.ini file (in BIOS, Basic Input Output System – based operating systems) or in the non-volatile RAM entries (in UEFI, Unified Extensible Firmware Interface – based operating systems). It is used by the Windows Boot Manager (Bootmgr) to load the operating system.
Here’s a brief overview of the BCD Editor and its components:
Table of Contents
BCD Editor Details
Location:
- The BCD editor is typically located in the \Boot folder on the system partition, which is usually the active partition where Windows is installed.
- The file itself is named BCD, and it is a binary file with no file extension.
BCD Editor:
- Command-line Tool: bcdedit is the command-line tool used to view and edit the BCD editor. You run it from Command Prompt with administrative privileges.
- GUI Tool: While Windows does not have a built-in graphical BCD editor, third-party tools can provide a GUI for easier management.
BCD Entries:
- Boot Loader Entries: These entries define the boot loaders for various operating systems or boot applications.
- Boot Manager Entries: These include settings for the Windows Boot Manager itself, such as the default OS to boot and timeout settings.
- Device Entries: These specify the device locations of the OS loader files.
Common Commands with bcd editor:
- List Entries: bcdedit /v – Displays detailed information about all BCD entries.
- Add a Boot Entry: bcdedit /copy {identifier} /d “Description” – Copies an existing entry and creates a new one with a custom description.
- Set Default Entry: bcdedit /default {identifier} – Sets the default boot entry.
- Delete an Entry: bcdedit /delete {identifier} – Removes a specified boot entry.
- Repair BCD Store: Sometimes used in recovery scenarios where the BCD store might be corrupted.
Some Common Application of BCD File Editor:
Firstly, open the Command line (CMD) interface-
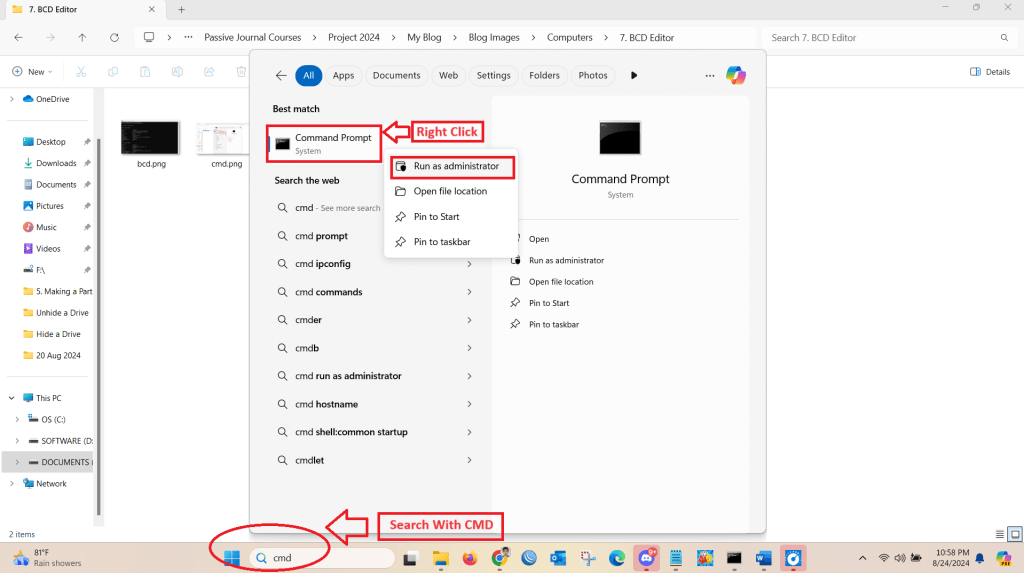
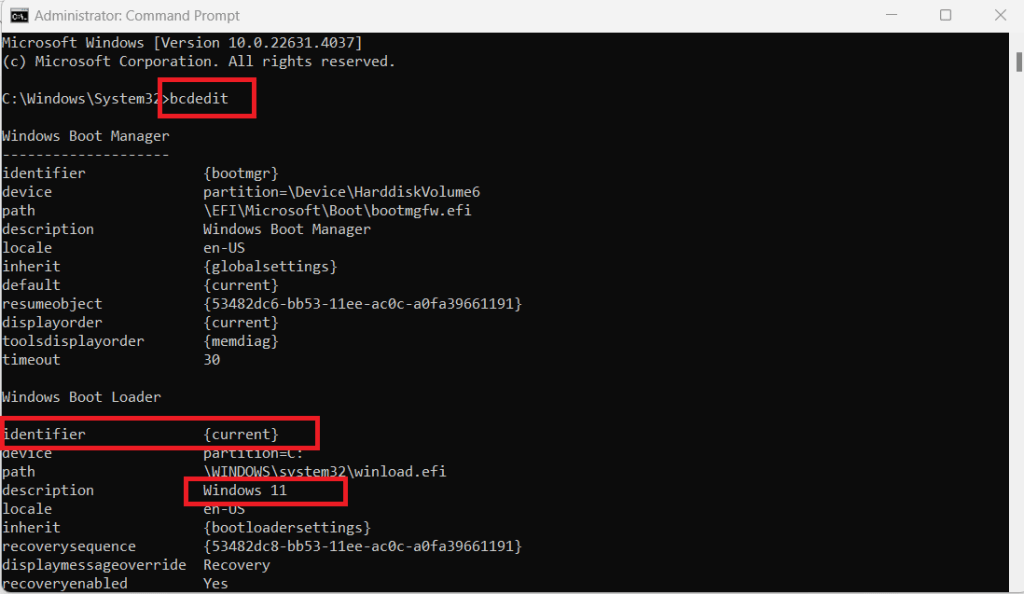
Type “bcdedit” in cmd to know the current status of BCD Editor of Windows and press “Enter”
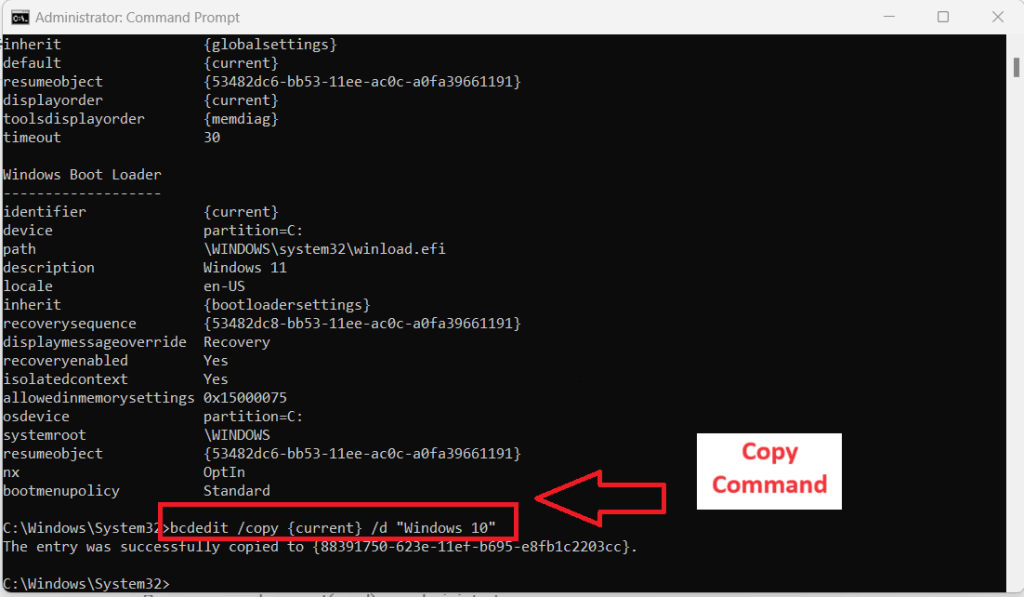
Copy the Current Boot Loader of the Windows 11 Operating System:
- Run command prompt (cmd) as administrator
- bcdedit /copy {current} /d “windows 10” -> Enter
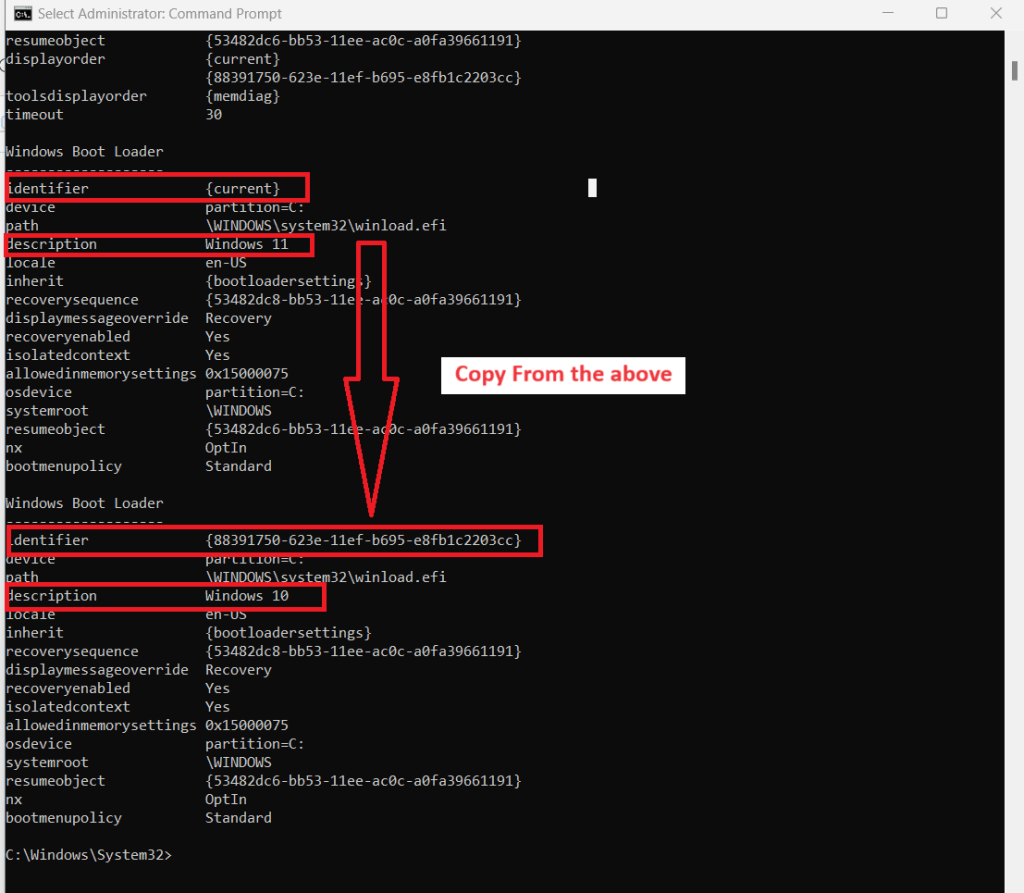
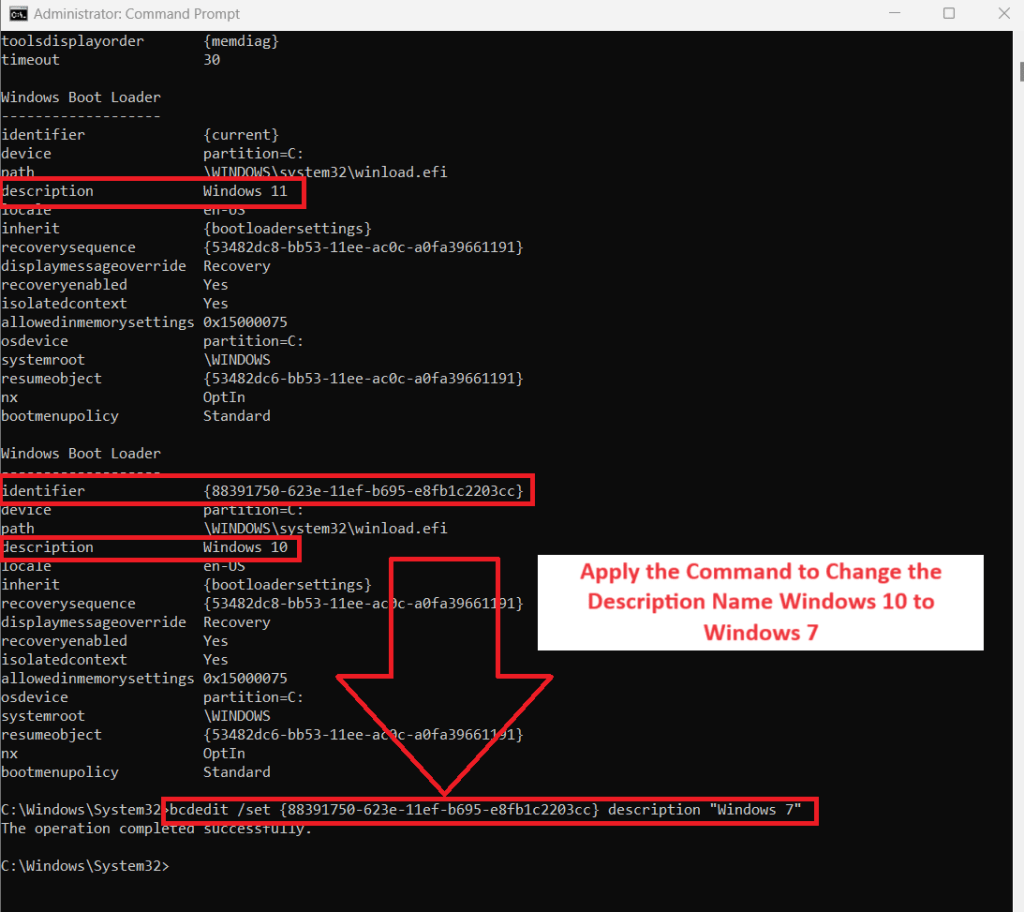
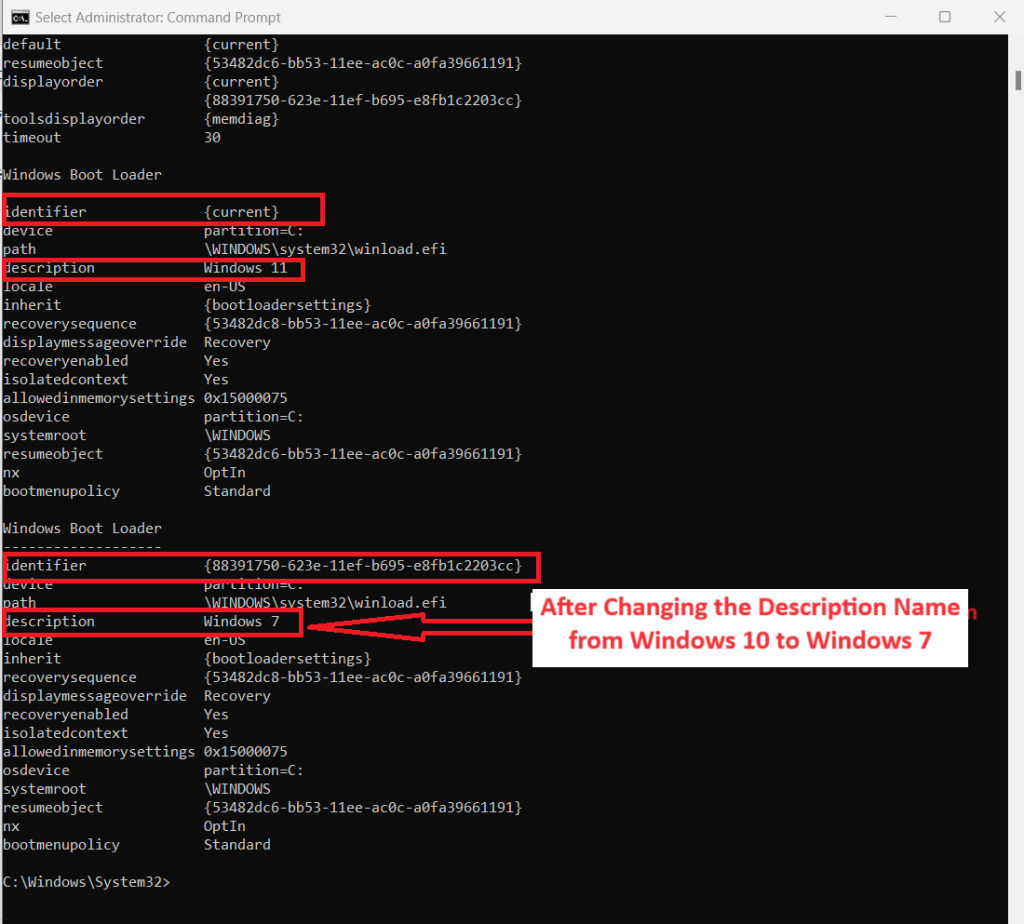
Change the Current Description Name as your Wish of Windows Boot Loader:
- Run command prompt (cmd) as administrator
- bcdedit /set {GUID} or {Identifier} description “windows 7” -> Enter
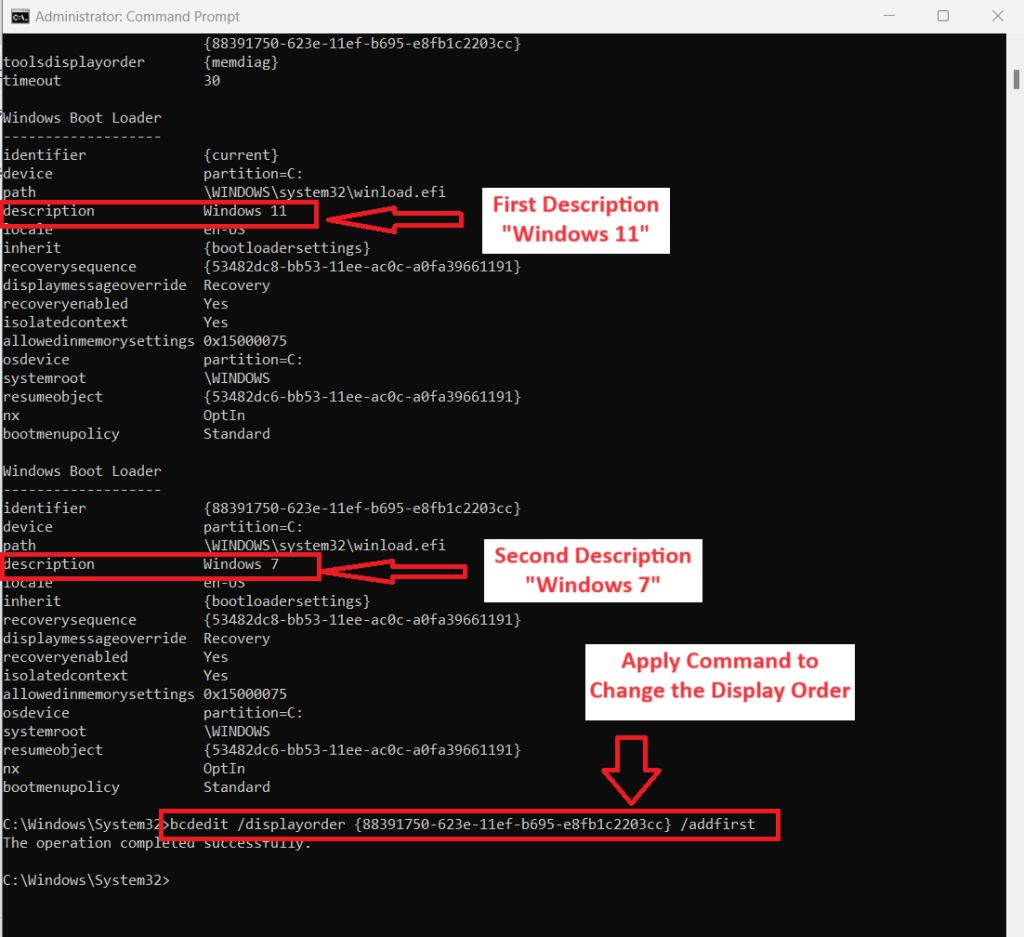
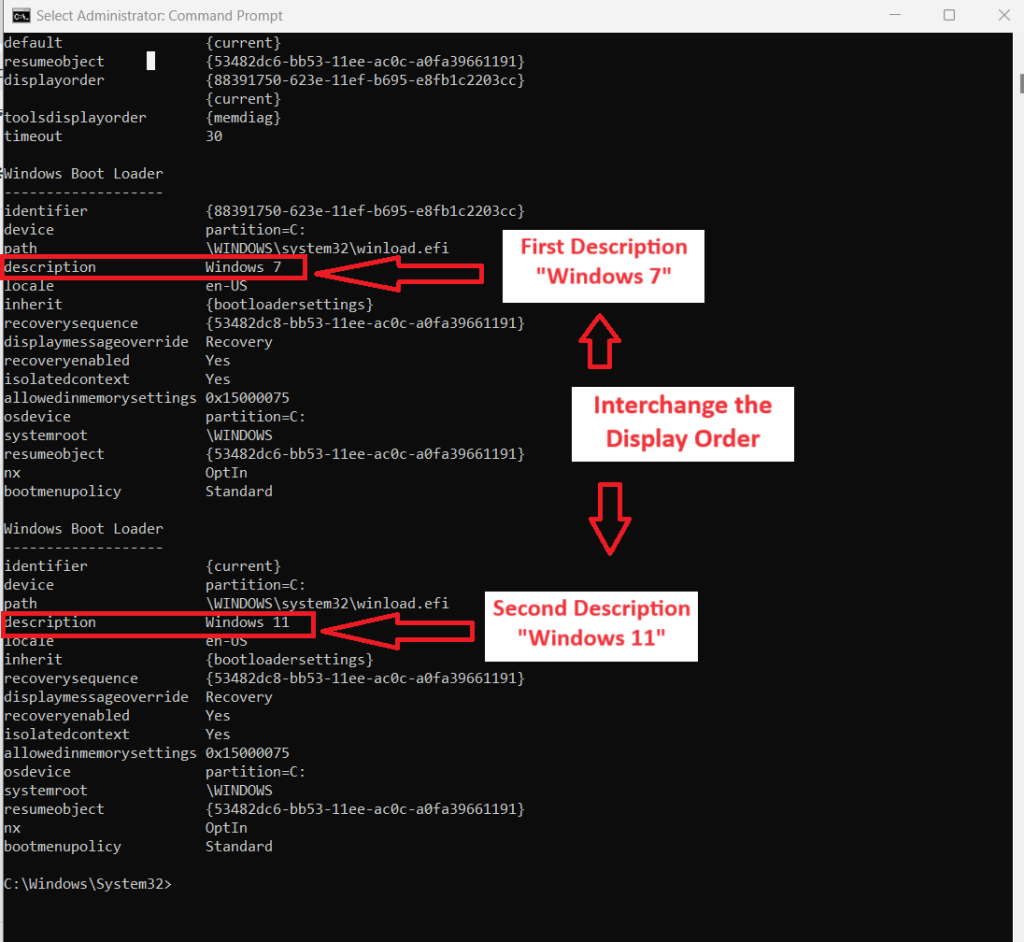
Display order change of Windows Boot Loader :
- Run command prompt (cmd) as administrator
- bcdedit /displayorder {GUID} or {Identifier} /addlast or /addfirst -> Enter
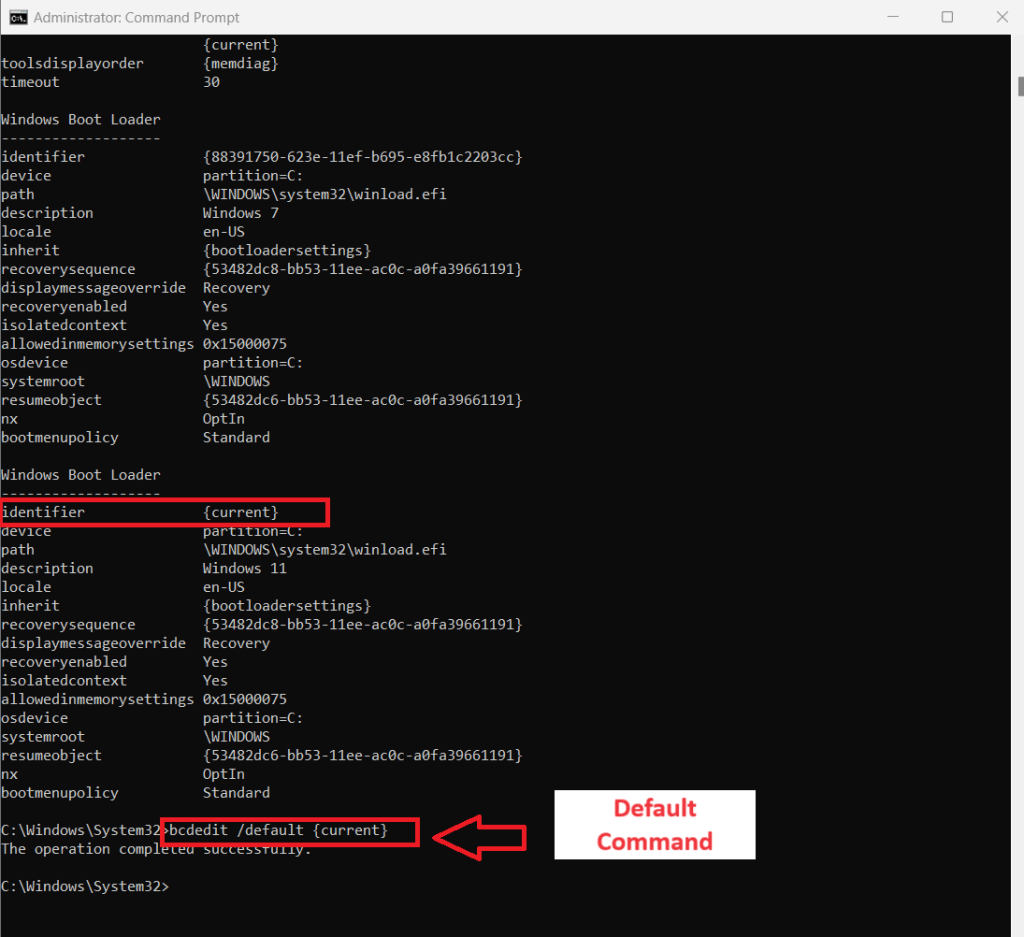
Setting default of Windows Boot Loader:
- Run command prompt(cmd) as administrator
- bcdedit /default {GUID} or {Identifier} -> Enter
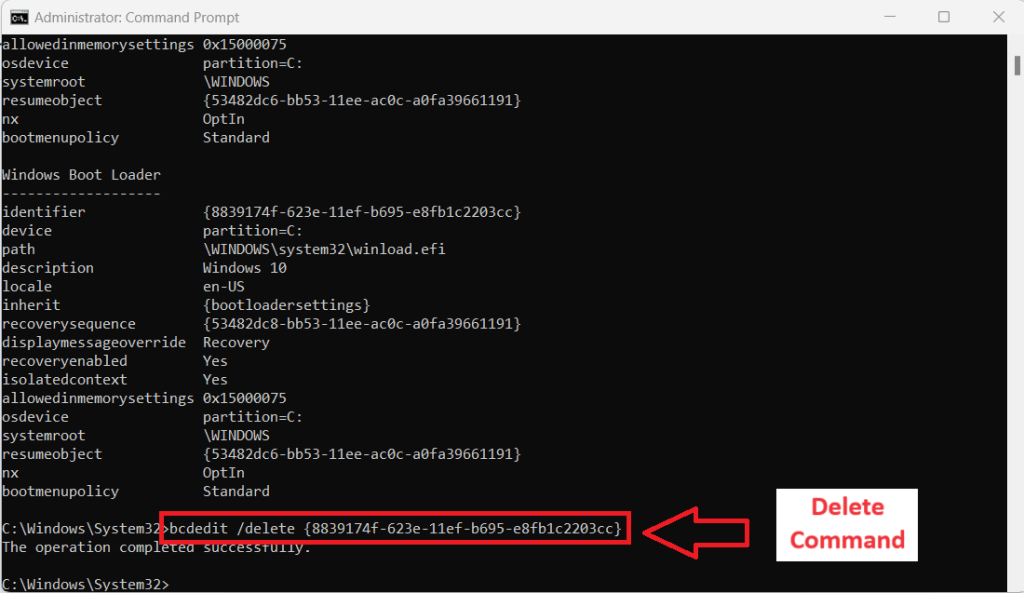
Delete Command of the Windows Boot Loader:
- Run command prompt(cmd) as administrator
- bcdedit /delete {GUID} or {Identifier} -> Enter
Set a Bootable Physical Drive entry to Boot Manager:
- Run command prompt (cmd) as administrator
- bcdedit /copy {current} or {Identifier} /d “Windows 10 ” -> Enter
- bcdedit /set {GUID} or {Identifier} device partition=D: -> Enter
- bcdedit /set {GUID} or {Identifier} osdevice partition=D: -> Enter
- bcdedit /set {GUID} or {Identifier} detecthal on -> Enter
Set a Bootable VHD entry to Boot Manager:
- Run command prompt (cmd) as administrator
- bcdedit /copy {current} or {Identifier} /d “Windows 10 vhd” -> Enter
- bcdedit /set {GUID} or {Identifier} device vhd=”[D:]\filename.vhd” -> Enter
- bcdedit /set {GUID} or {Identifier} osdevice vhd=”[D:]\filename.vhd” -> Enter
- bcdedit /set {GUID} or {Identifier} detecthal on -> Enter
Install an Operating System to a VHD file:
- Start the normal installation process -> Go to the partitioning page
- Press -> Shift + F10
- Write in command prompt(cmd):
- diskpart -> Enter
- select vdisk file=”[D:]\Windows 7.vhd” -> Enter
- attach vdisk -> Enter
- exit -> Enter
- exit -> Enter
- Refresh the partitioning page -> Click Refresh
- You will see Virtual Hard Disk below -> press vhd -> Next
So, your installation of OS in vhd is running.
Structure of BCD Editor:
- The BCD editor is structured in a hierarchical manner, with various data elements organized in a tree-like format. Each entry can have several properties, such as a description, device path, and the path to the boot loader.
Backup and Repair BCD Editor:
- It’s important to back up the BCD file editor before making significant changes. You can use tools like bcdedit to export the current BCD configuration to a file: bcdedit /export C:\bcdbackup.
- To repair or rebuild the BCD store, tools like the Windows installation media can be used to access recovery options and run commands like bootrec /rebuildbcd.
Understanding and managing the BCD store of an operating system of a Computer can be crucial for troubleshooting boot issues or configuring multi-boot systems. If you’re not familiar with command-line tools or BCD editing, it’s advisable to proceed with caution or seek help to avoid making changes that could prevent Windows from booting correctly.
Read More:
- A Complete Guide to MAC Addresses: Definition, Function, and Uses
- Comprehensive Guide to the Types of Computer Networks: LAN, WAN, PAN, and More
- Understanding Network Cabling: A Beginner’s Guide to the Basics of Wiring Standards
- What is the Internet? Good and Bad uses of It in the 21st Century
- What is a computer? Definition, Inventor, and best uses of it in 2024
- The History of the Computer
- The Classification of a Computer in the 21st Century
- Making a Bootable Pendrive Without Any Software for Installing an Operating System
- Making a Partition in 6 Easy Steps on a Hard Disk
- Hiding a Partition of a Hard Disk for Data Security
- Binary Code Basics: How Computers Use 0s and 1s to Communicate
- How to Fix Keyboard Hardware Issues: Repair Non-Working Keys Easily
FAQs
Q1: What is the BCD Editor?
Ans: The BCD Editor (Boot Configuration Data Editor) is a tool in Windows used to modify the boot configuration data, which controls how the operating system starts.
Q2: How can I access the BCD Editor in Windows?
Ans: You can access the BCD Editor via the Command Prompt by typing bcdedit.
Q3: What can you do with the BCD Editor?
Ans: It allows you to change boot options, set default OS, and manage multiple boot configurations.
Q4: Is it safe to use the BCD Editor?
Ans: It’s safe if you follow instructions carefully, but incorrect changes can affect the boot process.
Q5: How do I back up my BCD before editing?
Ans: Use the command bcdedit /export <filename> to back up the current configuration.
Q6: Can I restore the BCD if it’s corrupted?
Ans: Yes, you can restore it by using the command bootrec /rebuildbcd in the recovery environment to fix the boot configuration.
Q7: How do I set a default operating system in the BCD Editor?
Ans: You can set a default OS by using the command bcdedit /default {identifier}, replacing {identifier} with the desired OS’s identifier.
Q8: What are common errors encountered with BCD?
Ans: Common errors include “Boot Configuration Data file is missing” and “BCD is corrupted,” which can prevent Windows from booting.
Q9: How do I remove an entry from the BCD?
Ans: Use the command bcdedit /delete {identifier}, specifying the entry’s identifier to remove it.
Q10: Can I edit the BCD from within Windows?
Ans: Yes, but it’s recommended to use an administrator Command Prompt and back up the BCD before making changes.










Leave a Reply